Clipping path pictures are largely used in web-based businesses. Photographers and image editors also use it to combine multiple subjects or alter the background of an image.
When other methods fail, you can remove, cut out, or clip an item or product from its background using a powerful Photoshop tool called a clipping path. This approach is beneficial when your product is featured against a complicated or multicolored background.
Since I did freelancing on photoshop for the last five years, I know a lot about the different features of photoshop. Do you know how to use a clipping path? If not, then you have to keep continuing your reading. I have included How to create a Clipping Path in Photoshop in this article.
What is Photoshop’s Clipping Path?
However, to create an outline and remove the selected portion from the main image, you have to use the Pen Tool so that you can draw around the subject. It is a useful and efficient tool for altering photo backgrounds.
The software suite’s standard interface’s editing components can be shifted in various ways to improve workflow. With its developer tools, Lightroom provides some mobility.
Capture One also outperforms Adobe’s rival regarding how layers are handled in its interface. Single layers can be set in Capture One for nearly all of its support tools.
Creating a Clipping Path in Photoshop
Step-1: Open the File
First, Launch Adobe Photoshop and load your photo.
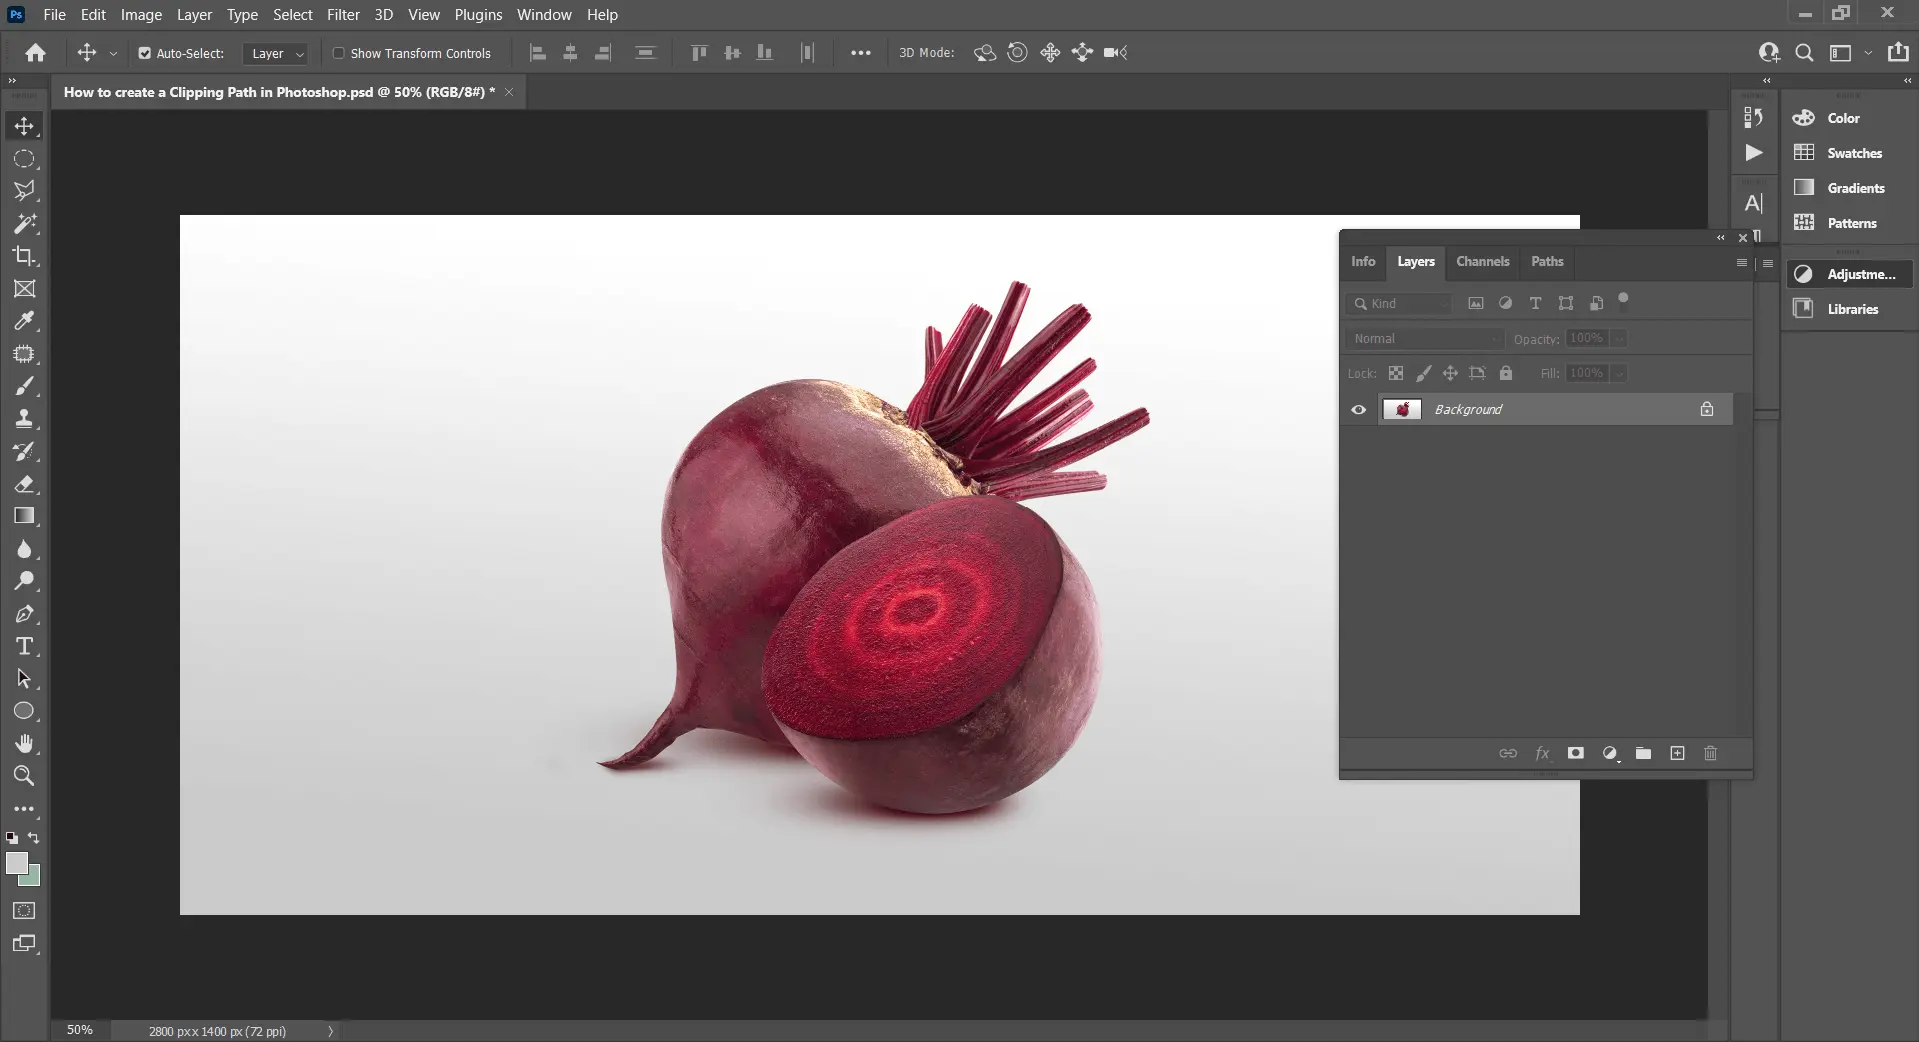
Step-2: Pen tool: Setup is important
To create a clipping path, use the Photoshop Pen tool. You will notice that Photoshop’s Pen tool is almost identical to Adobe Illustrator’s. However, you must ensure your settings are correct to create a clipping path rather than a shape with the tool.
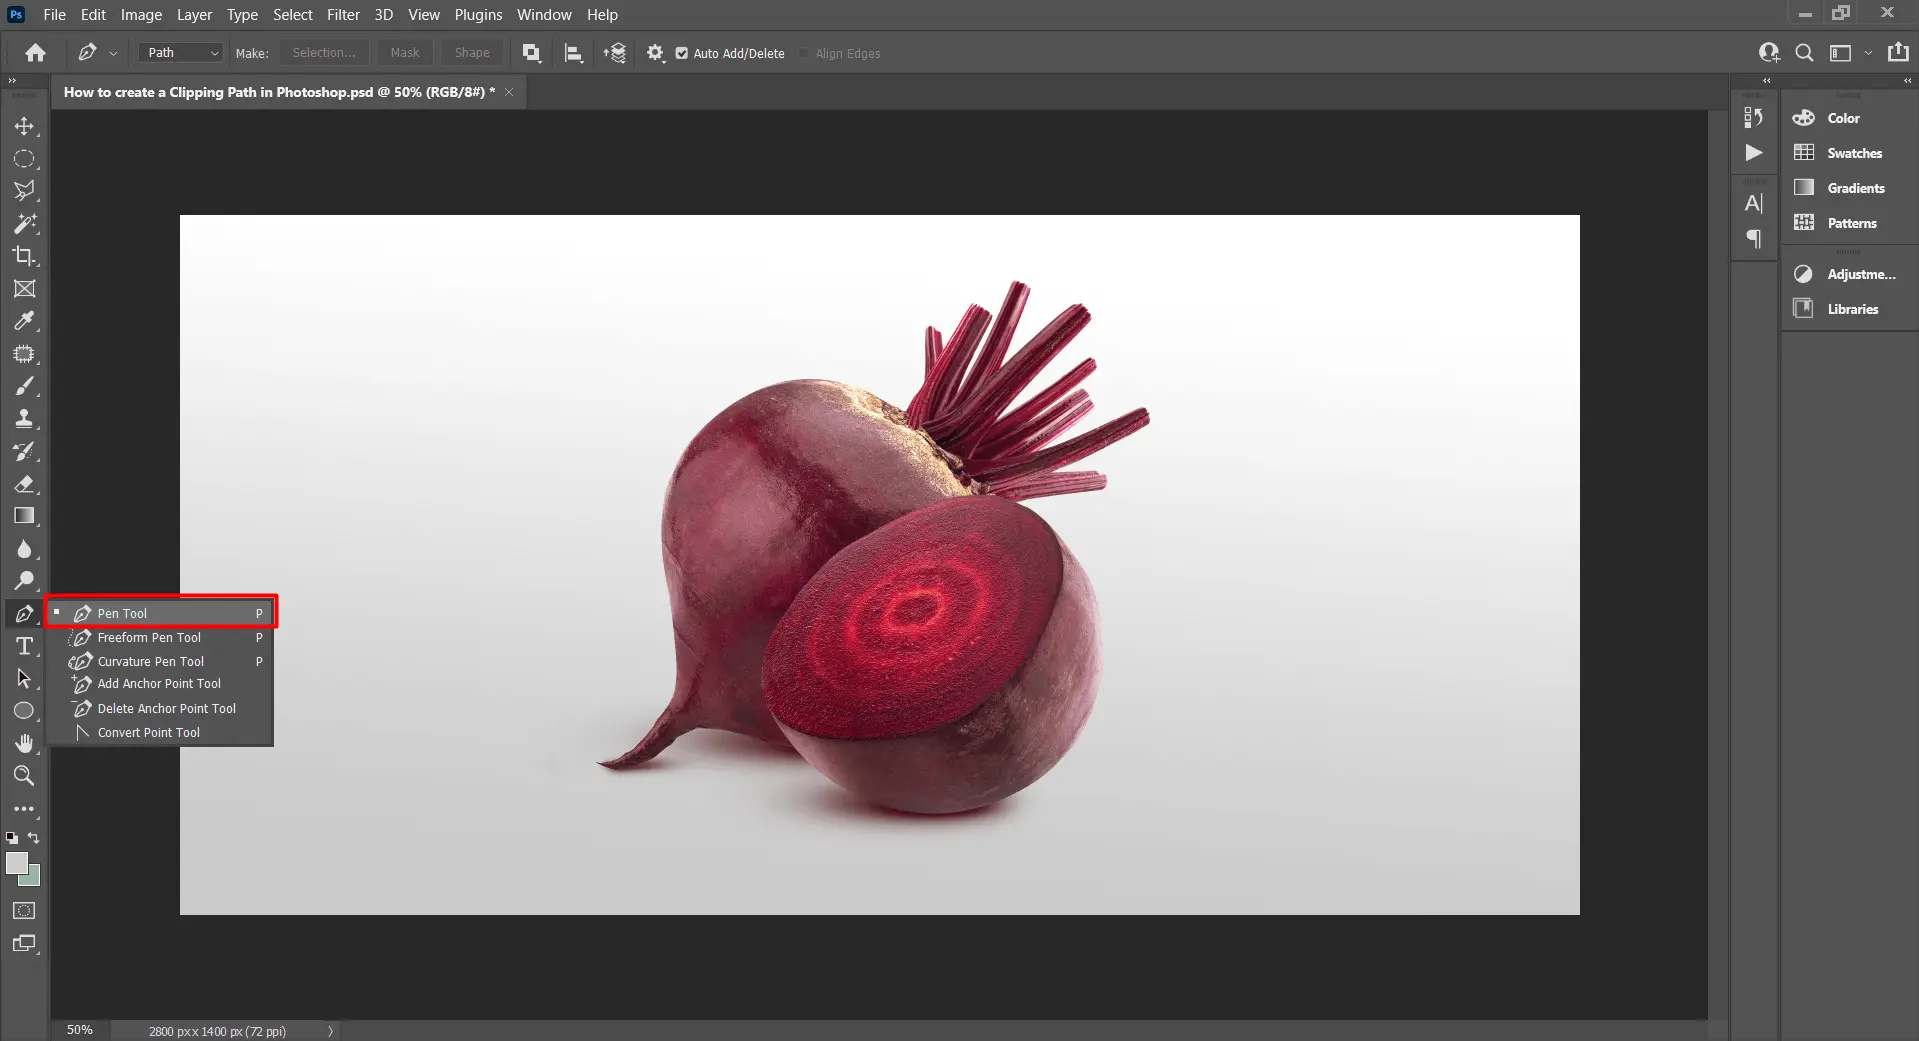
In your picture report, select the Pen Apparatus. It can be found in the Toolbar, or you can type p to have it picked for you automatically. You can find the Pen Tool’s settings on the Options Bar at the top of the application window. Choose Combine Shapes and Path.

Clipping Path Work may help you achieve tight deadlines for product photo editing. Demand a 6-hour answer.
Step-3: Establish Anchor Points
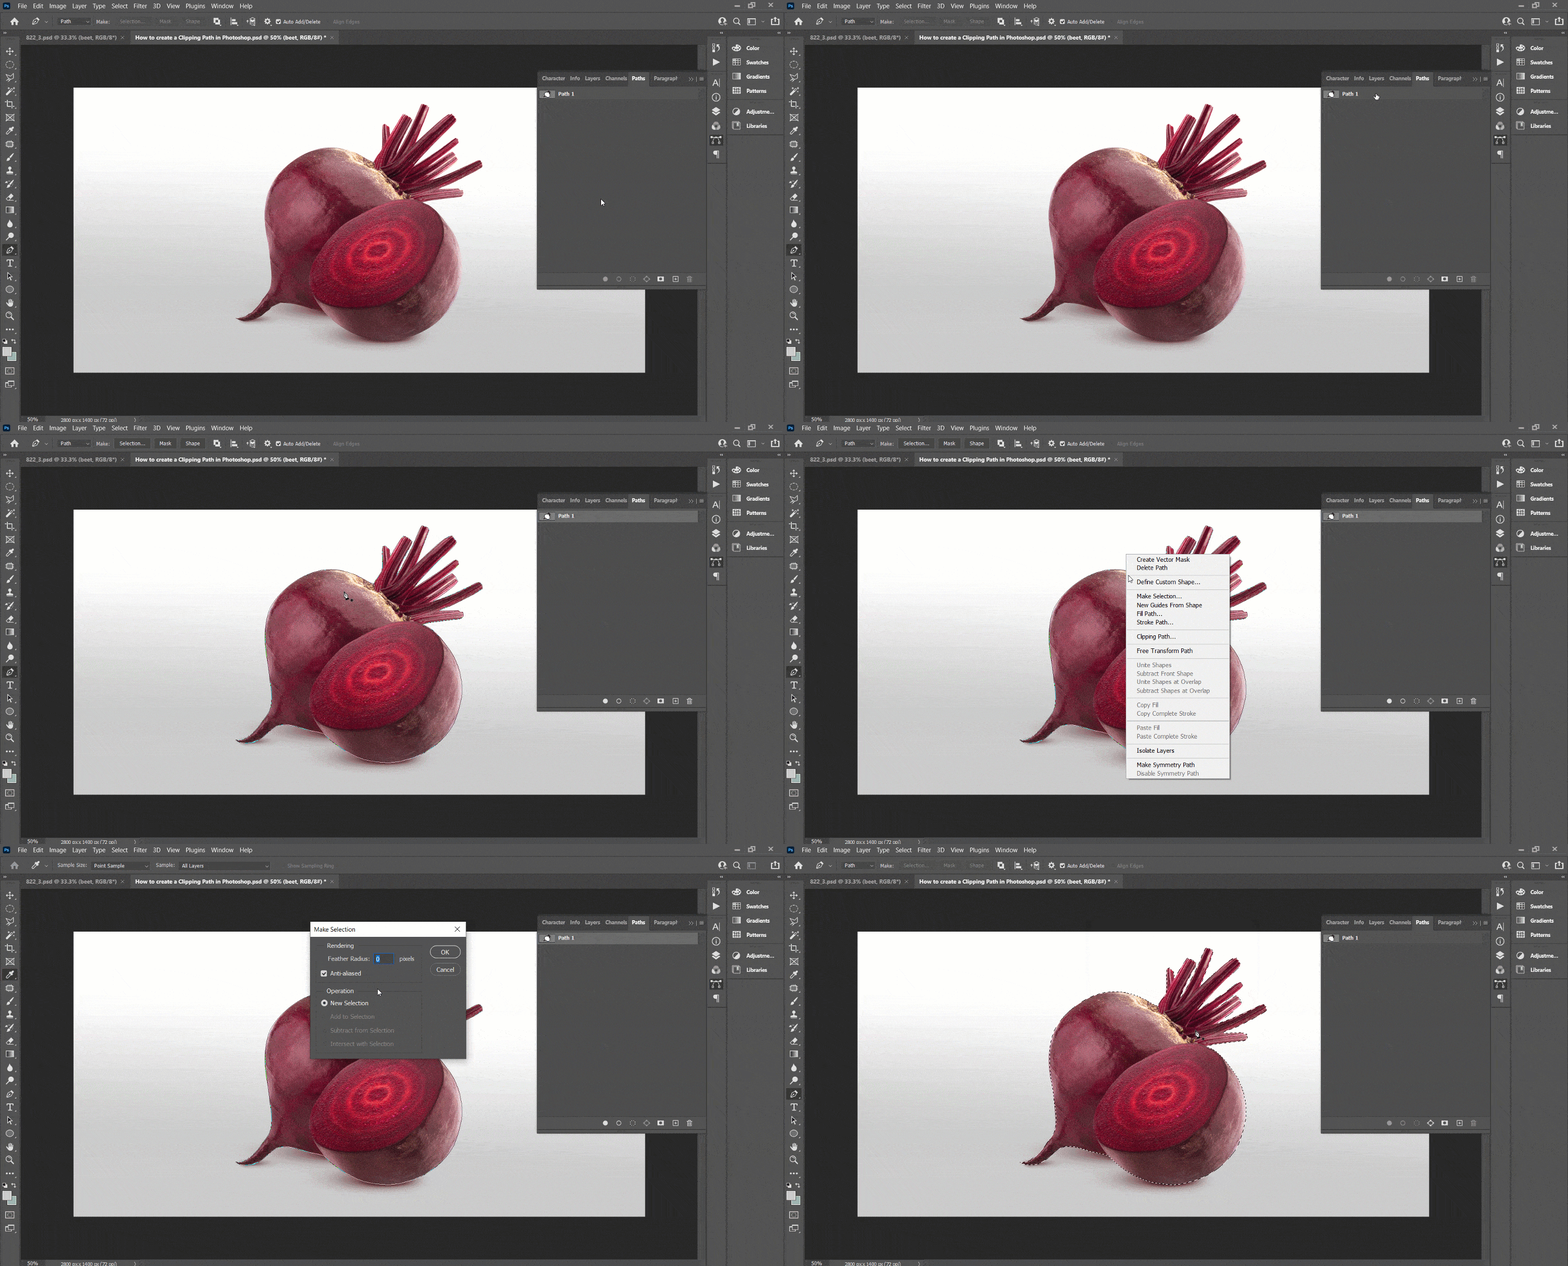
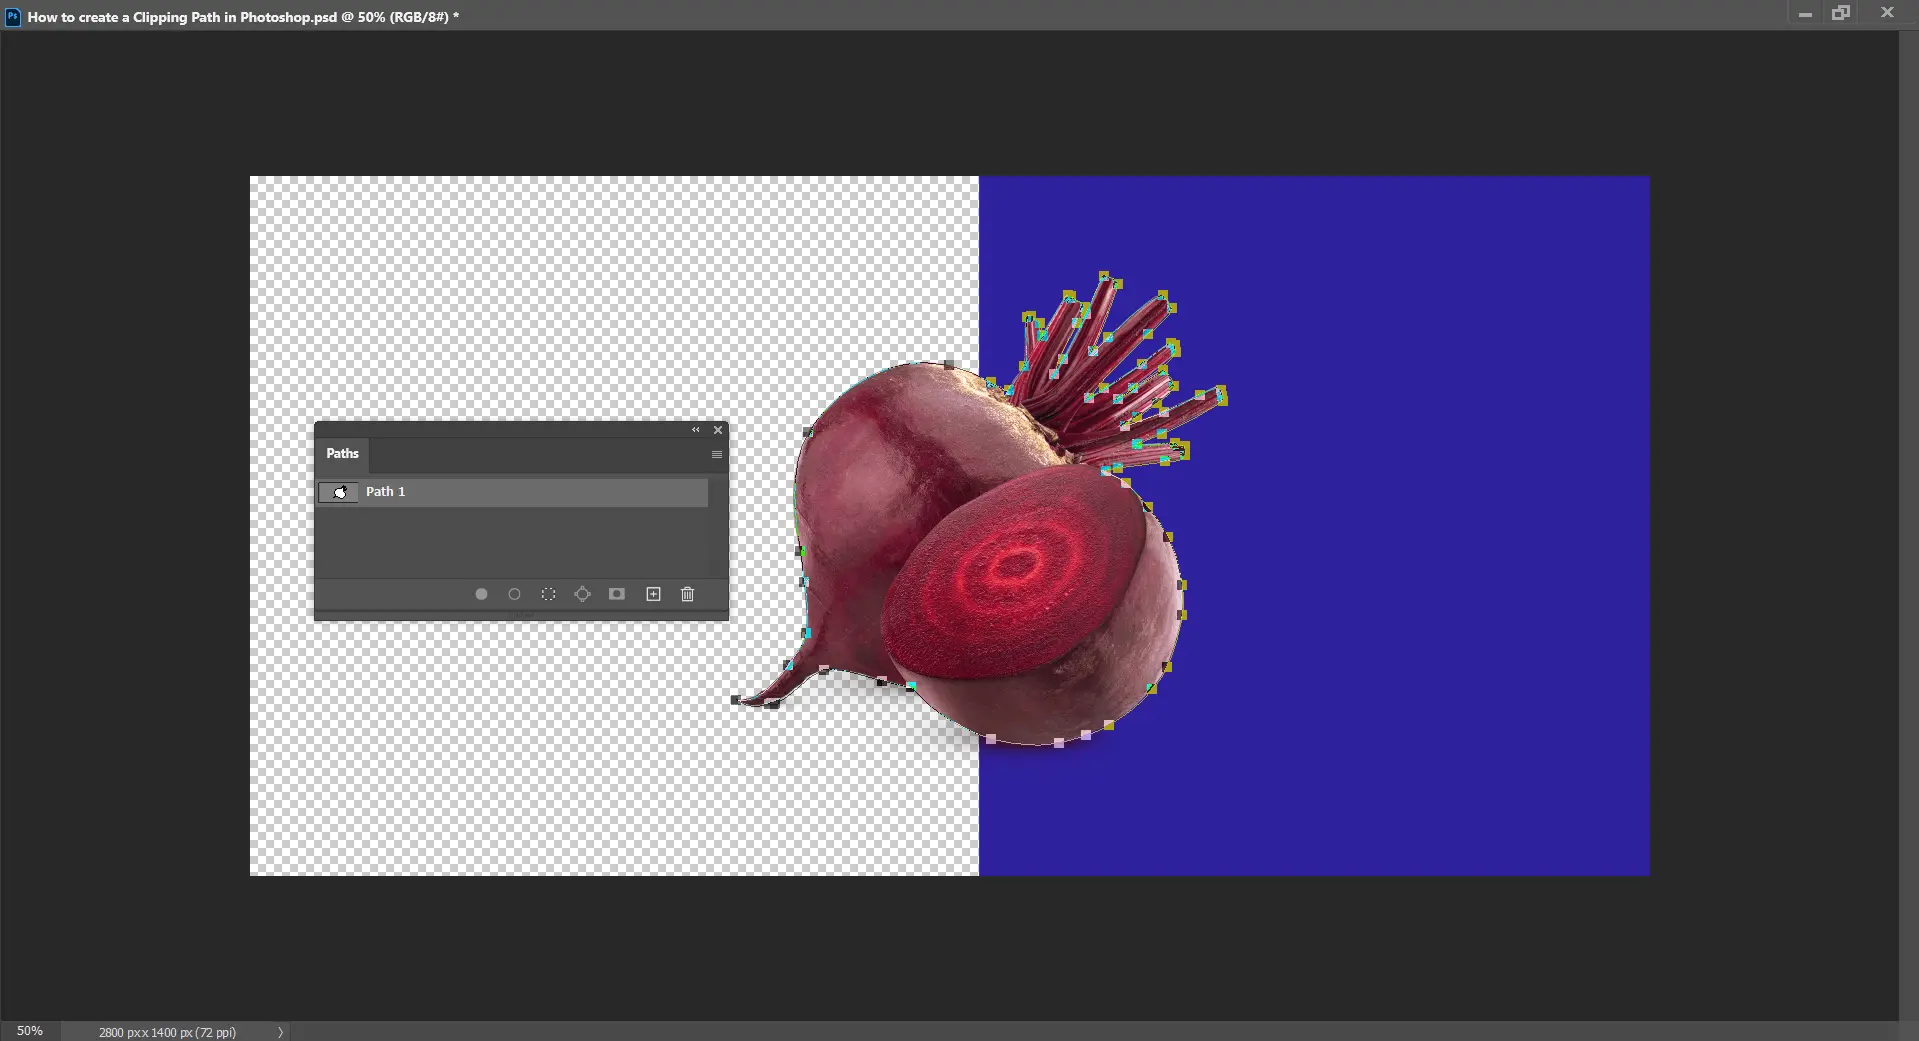
First, use the pen tool to zoom in on your image to see the edges. Maintaining it at nearly 300% is preferable. Because of this, you can accurately draw the Path. At this point, start pointing at the corners of the object you want to cut out. These locations are referred to as anchor points. Keep on making marks until you arrive at the starting spot.
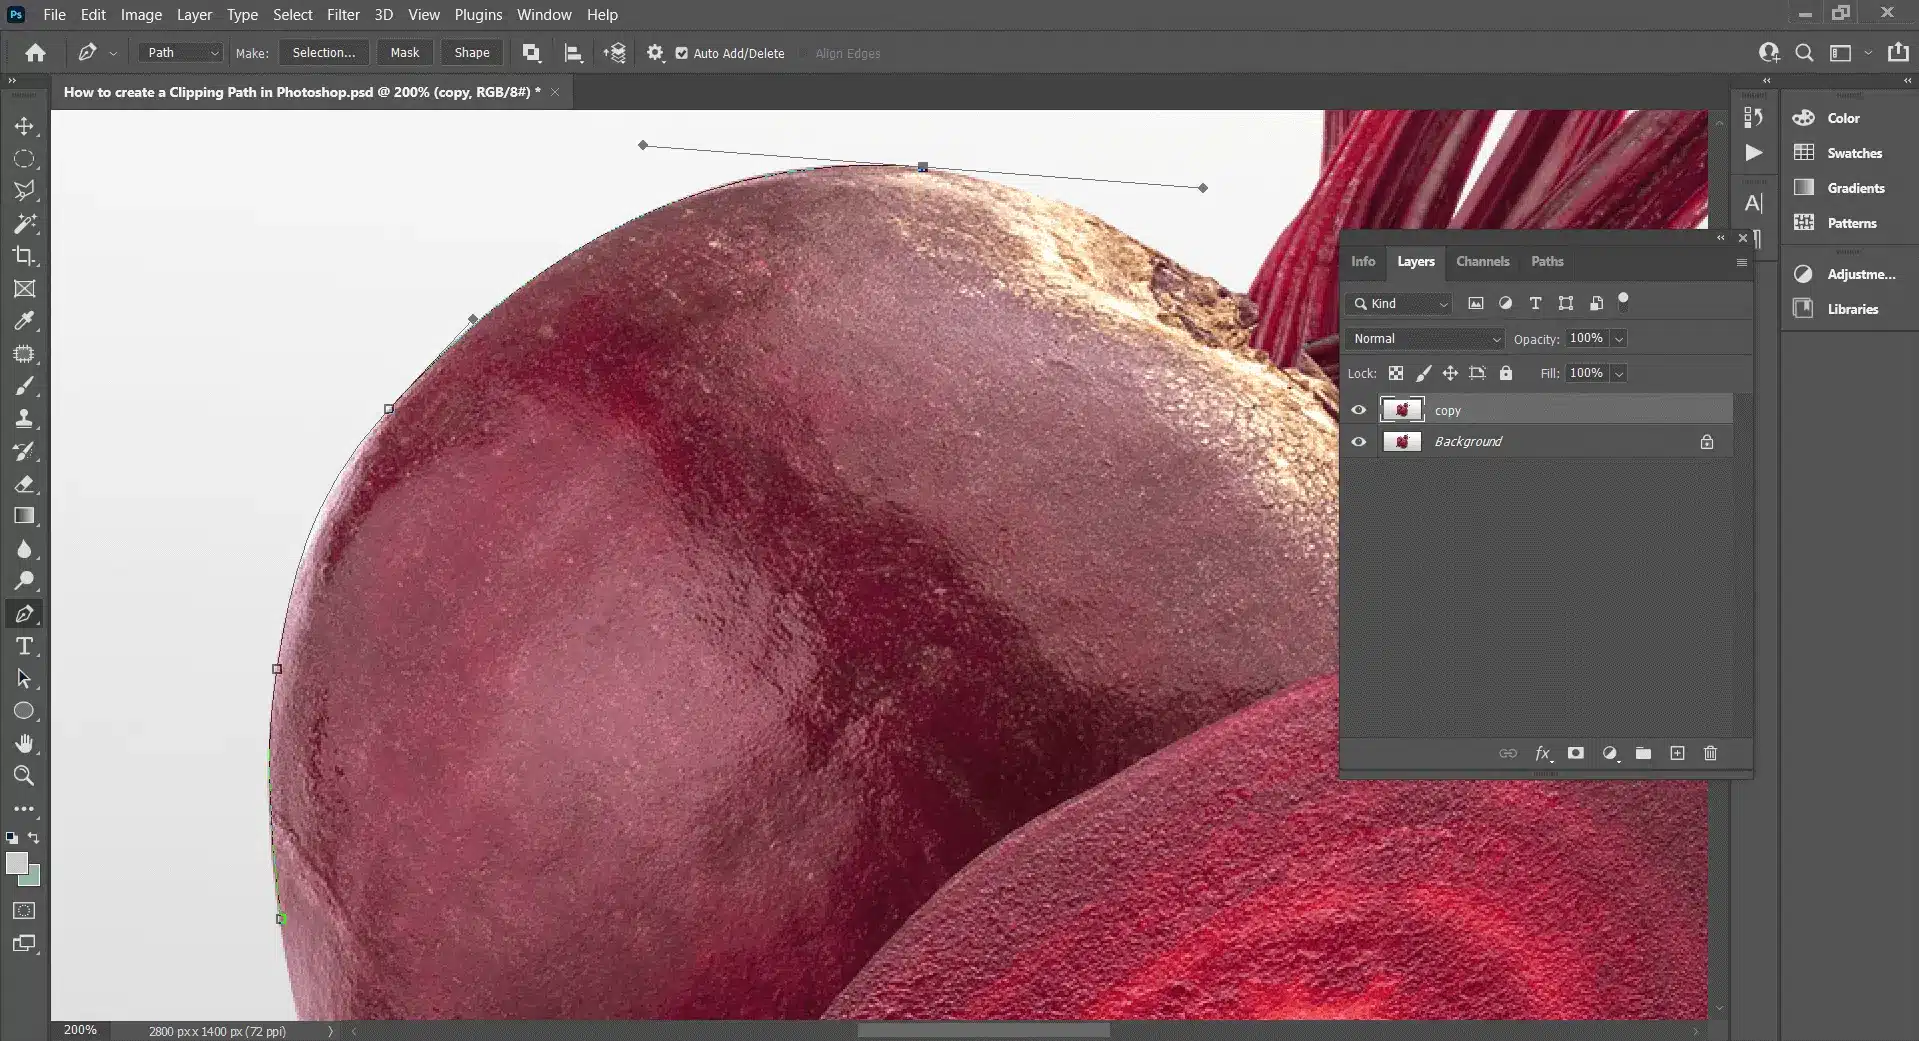
When separating items from one another, you need to be careful with the edges to give them a more natural appearance. Therefore, ensure that your mark is as precise as possible.
Check out this video lesson by Cristi Kerekes to learn all you need to know about the Pen Tool in Photoshop.
Step 4: Save the path
After you have finished marking:
1. Go to the layer panel.
2. Select the path tab.

3. Select Save Path from the menu in the upper left corner right now.
4. Give it the name Path 1 as well.
Step 5: Create a Clipping Path
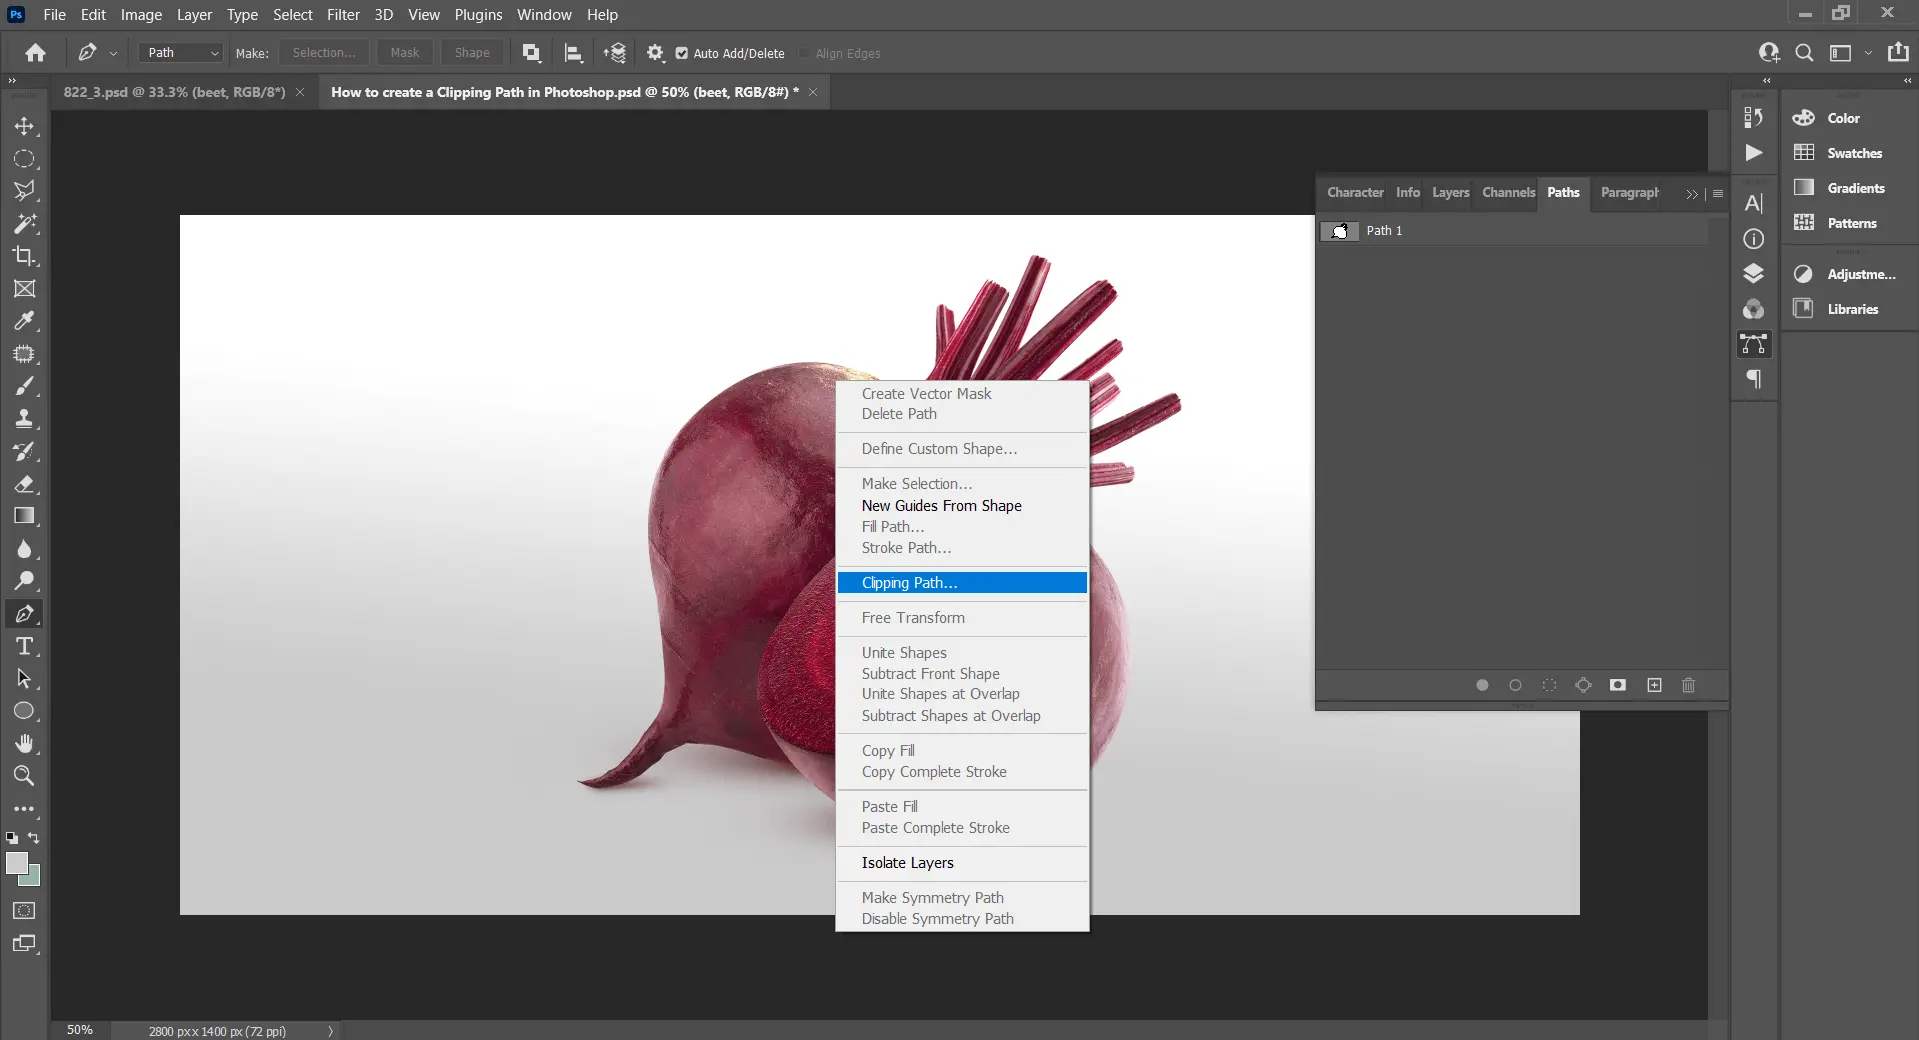
Press the right button to select the clipping path.
A pop-up box will contain a selection menu. One of the boxes is flatness. The distance from the image’s edge to the clipping path is measured by flatness. The smoothness of the image is determined by it.
Step-6: Save Your Picture
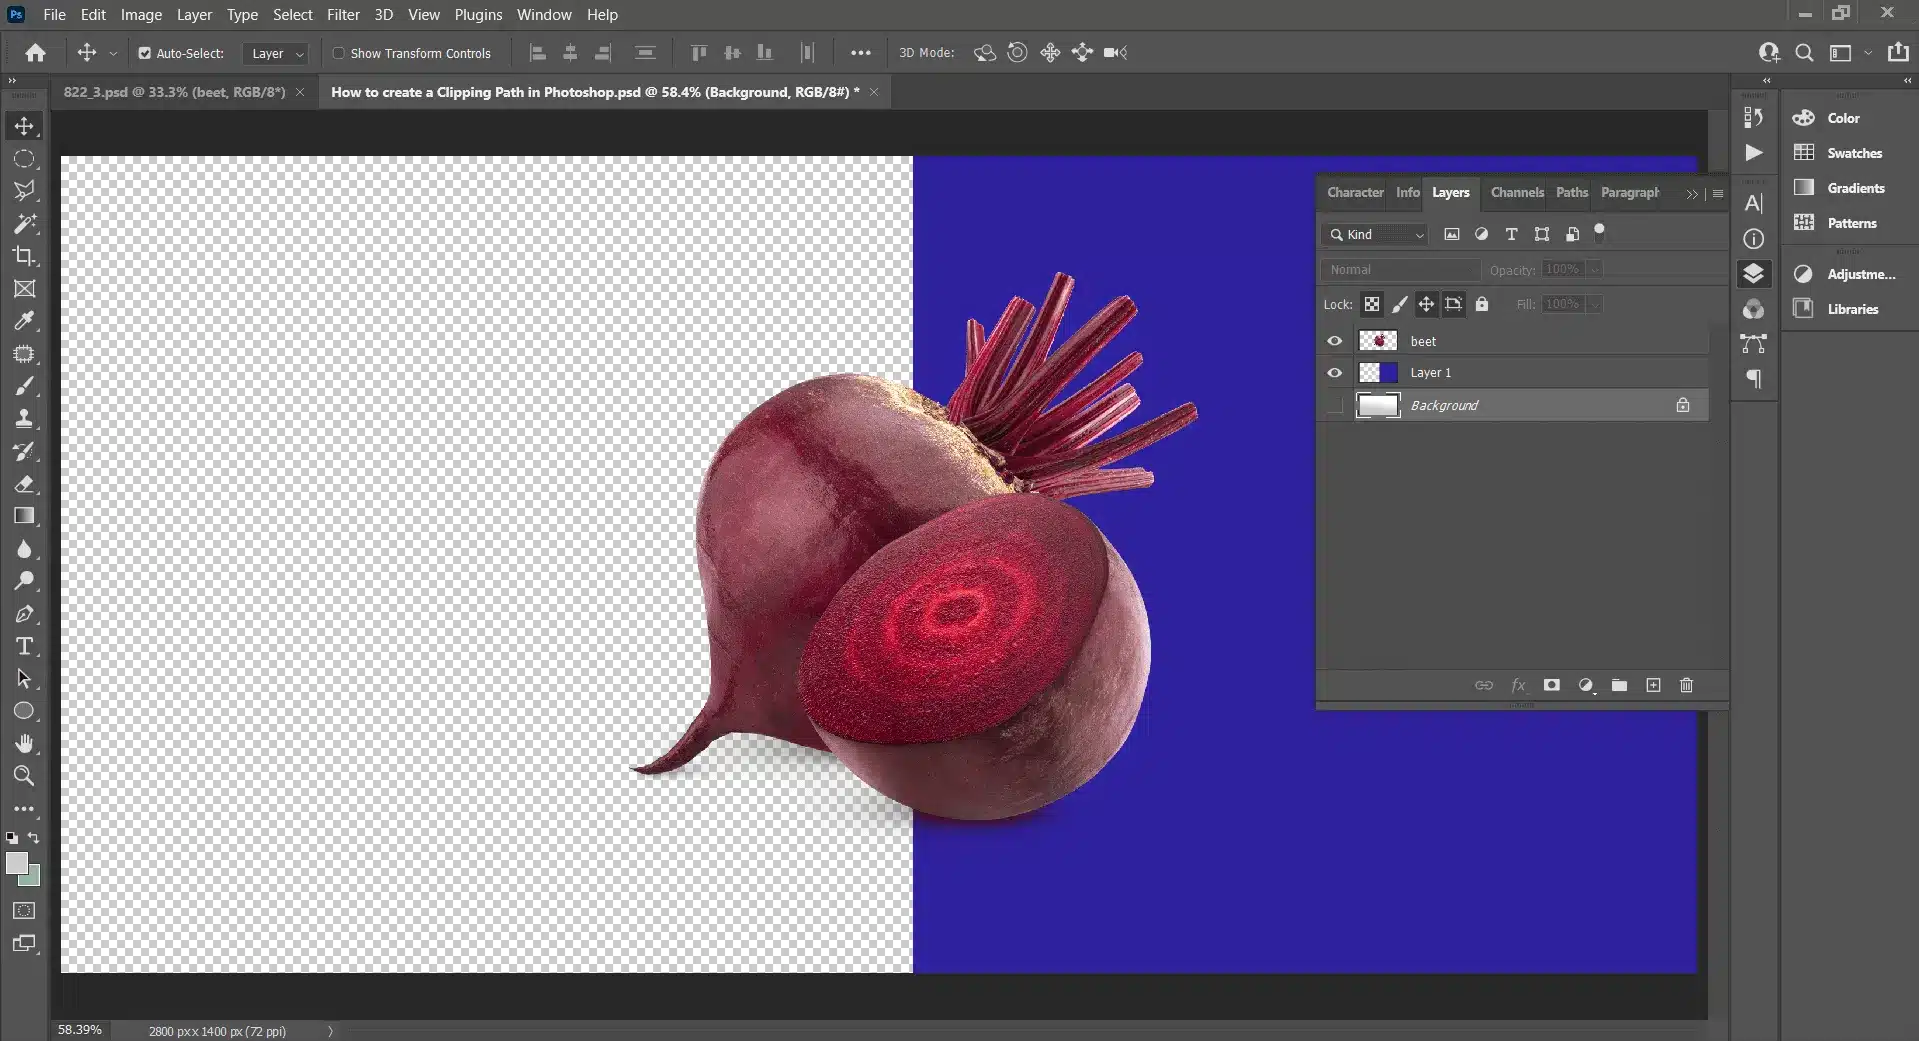
Save your photo at last. Done! Remember that you can easily edit this file later if you want to complete this task again. Additionally, you can send it to someone else.
Take care when saving both the JPEG and PSD files. It allows you to use the image however you want. You can use the image to make any changes you want after saving it. You could, for instance, alter the background of the image.
Learn how to use the Pen tool in Photoshop to its full potential. It explains how to use the Pen tool to draw pathways and complicated shapes and transform them into selections or vector masks. Use the Direct Selection tool to alter paths and create flawless edges for forms, shows, and selections.
Frequently asked questions
I included the most common queries about How to Create a Clipping Path in Photoshop in this section.
1. When is a clipping path necessary?
It would be best if you had a clipping path for the following causes:
- When a product needs to be shown against a white or plain background.
- When you need to show your product against a background that is transparent.
- When you want to include your product alongside others in a composite photograph.
- When you want to change the color of all or a portion of your product (important if you have multiple colors of the same item).
- Whenever you need to separate your product from the rest of the image.
2. What tools are required to create a clipping path in Photoshop?
3. How do I choose the Path I made?
The selection process is different depending on your computer or device. You can select the Path by pressing CTRL+Enter on Windows. On the other hand, MAC users must select by pressing CMD+Return.
4. Are masking and clipping paths identical in Photoshop?
5. Why does using a clipping mask cause my image to disappear?
6. How does Photoshop CC make a clipping path?
In Photoshop CC, you can create a clipping path in the following ways: In your Photoshop CC application, open the image. Pick out the Pen Tool. Draw the Path of the clipper around the subject. Press CTRL+Enter to make the determination. Choose the new route.
Final Thoughts
If you know How to Create a Clipping Path in Photoshop, your editing skills can be enhanced. The clipping path is commonly used in most highly edited images in high demand. Therefore, creating a clipping path in Photoshop is essential if you want to work as a professional photo editor.
It is difficult to learn how to make a clipping path in Photoshop. If you have some prior experience with such editing, you should be able to learn this fairly quickly.

Thank you for this detailed guide on creating a clipping path in Photoshop Your step-by-step instructions are very clear and helpful. I especially appreciate the tips on using the Pen Tool and the importance of setting anchor points accurately. This will definitely improve my photo editing skills. Looking forward to more tutorials like this!
Aftyer looking into a number of the blog posts on your
website, I seriously appreciate your technique off blogging.
I saved as a favorite it to myy bookmark website lost and will
be checking bsck soon. Please check outt my web site as well and let me know what you think.
Great article! I appreciate the clear and insightful perspective shared. It’s fascinating to see how this topic is developing. For those interested in diving deeper, I found an excellent resource that expands on these ideas: check it out here. Looking forward to hearing others thoughts and continuing the discussion!
I was just as enthralled by your work as you were. Your sketch is elegant, and your written content is sophisticated. However, you seem concerned about potentially delivering something questionable soon. I’m confident you’ll resolve this issue quickly and return to your usual high standards.
Thank you so much for your encouragement and faith in my work! I’ll definitely strive to maintain the quality you enjoy.
Your blog is a testament to your dedication to your craft. Your commitment to excellence is evident in every aspect of your writing. Thank you for being such a positive influence in the online community.
Your support and feedback inspire me to continue sharing and improving. Thank you for being a part of this journey!